Tuesday, December 27, 2016

How to install vDDoS Protection - Reverse Proxy Layer 7 Firewall Filter Mitigate DOS, DDOS, SYN Floods, or HTTP Floods attack

What is vDDoS Protection?

vDDoS Protection is free software to provide a Reverse Proxy Server HTTP(S) protocols. It act as a Layer 7 Firewall Filter & Mitigate DOS, DDOS, SYN Floods, or HTTP Floods attack to protect your website.

Features:
-Reverse Proxy
-DDoS Protection
-Robot Mitigator
-HTTP challenge/response
-reCaptcha Robot challenge
-HTTP Denial of Service tools
-Cookie challenge/response
-Block/Allow Country Code You Want (Status 403)
-Limit the request connection coming from a single IP address (Status 503)
-CDN Support (CloudFlare, Incapsula...)
-Whitelist for Botsearch (SEO Support, Allow Botsearch: Google, Alexa, Bing, Yahoo, Yandex, Facebook...)

How it work?

vDDoS Protection is Nginx bundled with module HTTP/2; GeoIP; Limit Req, Testcookie; reCaptcha processor... Working like CloudFlare, but vDDoS is software help you build your own System Firewall.

If your site does not use protection service: (accept all queries)

vDDoS-HTTP-S-DDoS-Protection-Reverse-Pro


If your site uses protection service: (challenge all queries)
-Human queries:

vDDoS-HTTP-S-DDoS-Protection-Reverse-Pro

vDDoS-HTTP-S-DDoS-Protection-Reverse-Pro


-Bad Bots queries:
vDDoS-HTTP-S-DDoS-Protection-Reverse-Pro

vDDoS-HTTP-S-DDoS-Protection-Reverse-Pro


How to install vDDoS?
-vDDoS Protection only support CentOS Server 5/6/7 x86_64 (http://centos.org) & CloudLinux Server 5/6/7 x86_64 (http://cloudlinux.com)

-Please go to Homepage and download vDDoS Protection version working on your system (https://github.com/duy13/vDDoS-Protection)

-vDDoS Protection should be installed before installing other things (cPanel, VestaCP, LAMP, LEMP...)

yum -y install epel-release 
yum -y install curl wget gc gcc gcc-c++ pcre-devel zlib-devel make wget openssl-devel libxml2-devel libxslt-devel gd-devel perl-ExtUtils-Embed GeoIP-devel gperftools gperftools-devel libatomic_ops-devel perl-ExtUtils-Embed gcc automake autoconf apr-util-devel gc gcc gcc-c++ pcre-devel zlib-devel make wget openssl-devel libxml2-devel libxslt-devel gd-devel perl-ExtUtils-Embed GeoIP-devel gperftools gperftools-devel libatomic_ops-devel perl-ExtUtils-Embed 

Example: my system is CentOS 7 x86_64 install vDDoS 1.10.1 Version (only need wget a file vddos-1.10.1-centos7):

curl -L https://github.com/duy13/vDDoS-Protection/raw/master/vddos-1.10.1-centos7 -o /usr/bin/vddos
chmod 700 /usr/bin/vddos
/usr/bin/vddos help

/usr/bin/vddos setup
(This installation takes about 15 minutes or more)

vDDoS Command Line?
   Welcome to vDDoS, a HTTP(S) DDoS Protection Reverse Proxy. Thank you for using!

                Command Line Usage:
        vddos setup             :installing vDDoS service for the first time into /vddos
        vddos start             :start vDDoS service
        vddos stop              :stop vDDoS service
        vddos restart           :restart vDDoS service
        vddos autostart         :auto-start vDDoS services on boot
        vddos attack            :create a DDoS attacks to HTTP target (in 30 min)
        vddos stopattack        :stop "vddos attack" command
        vddos help              :display this help

                                        Please sure download vDDoS source from: vddos.voduy.com

How to use vDDoS protect your website?
Please edit your website.conf file in /vddos/conf.d
Example Edit my website.conf:

# nano /vddos/conf.d/website.conf

# Website       Listen               Backend                  Cache Security SSL-Prikey   SSL-CRTkey
default         http://0.0.0.0:80    http://127.0.0.1:8080    no    200      no           no
your-domain.com http://0.0.0.0:80    http://127.0.0.1:8080    no    200      no           no
default         https://0.0.0.0:443  https://127.0.0.1:8443   no    307      /vddos/ssl/your-domain.com.pri /vddos/ssl/your-domain.com.crt
your-domain.com https://0.0.0.0:443  https://127.0.0.1:8443   no    307      /vddos/ssl/your-domain.com.pri /vddos/ssl/your-domain.com.crt
your-domain.com https://0.0.0.0:4343 https://103.28.249.200:443 yes click    /vddos/ssl/your-domain.com.pri /vddos/ssl/your-domain.com.crt

"your-domain.com" is my site on my Apache backend http://127.0.0.1:8080 want to be Protection by vDDoS
"default" is option for All remaining sites
/vddos/ssl/your-domain.com.pri is SSL Private key my website
/vddos/ssl/your-domain.com.crt is SSL Public key my website
Cache:
variable: no, yes (Sets proxy cache website on vDDoS)
Security:
variable: no, 307, 200, click, 5s, high, captcha (Sets a valid for Security Level Protection)
Note Security Level: no < 307 < 200 < click < 5s < high < captcha
Restart vDDoS after saving:
vddos restart

Set Real IP traffic from Proxy or CDN:
Please edit file cdn-ip.conf
# nano /vddos/conf.d/cdn-ip.conf

# Cloudflare
set_real_ip_from 103.21.244.0/22;
...
Deny Country or IP:
Please edit file blacklist-countrycode.conf
# nano /vddos/conf.d/blacklist-countrycode.conf

geoip_country /usr/share/GeoIP/GeoIP.dat;
map $geoip_country_code $allowed_country {
    default yes;
    US yes;
    CN no;
    
}
deny 1.1.1.1;
Allow your IP Address do not need protection & challenge:
Please edit file whitelist-botsearch.conf
# nano /vddos/conf.d/whitelist-botsearch.conf

#Alexa Bot IP Addresses
204.236.235.245; 75.101.186.145;
...
Use Mode reCaptcha:
Please edit file recaptcha-secretkey.conf & recaptcha-sitekey.conf
# nano /vddos/conf.d/recaptcha-sitekey.conf
# Website        reCaptcha-sitekey (View KEY in https://www.google.com/recaptcha/admin#list)
your-domain.com        6Lcr6QkUAAAAAxxxxxxxxxxxxxxxxxxxxxxxxxxx
your-domain.org        6Lcr6FFFAAAAAxxxxxxxxxxxxxxxxxxxxxxxxxxx
...
# nano /vddos/conf.d/recaptcha-secretkey.conf
DEBUG=False
RE_SECRETS = { 'your-domain.com': '6Lcr6QkUAAAAxxxxxxxxxxxxxxxxxxxxxxxxxxx',
               'your-domain.org': '6LcKngoUAAAAxxxxxxxxxxxxxxxxxxxxxxxxxxx' }

(Go to https://www.google.com/recaptcha/admin#list and get your key for vDDoS)


Recommend?


-Recommend You use vDDoS with CloudFlare Free/Pro (hide your website real IP Address)
(CloudFlare is Mitigate Firewall Layer 3-4)
(vDDoS Protection is Mitigate Firewall Layer 7)
-Download vDDoS Protection packages from vDDoS HomePages
-Use this soft only for testing or demo attack!

Friday, December 2, 2016

How to Self Host Images and Photos with Lychee

Prerequisites:

Run updates:

> sudo apt-get update
Install LAMP
Go ahead and install Apache, PHP and MySQL using these commands:

> sudo apt-get install apache2
> sudo apt-get install php

> sudo apt-get install mysql-server

> sudo apt install php libapache2-mod-php
If you are asked to create a username and password for MySQL, make a note of this as you’ll need it later.

To configure Lychee, we need make sure that the following list of extensions is enabled in our PHP build:

session
exif
mbstring
gd
mysqli
json
zip
To see what extensions are pre-enabled on your box, type this command:

> sudo php –m
In my test, my VPS was missing mbstring, gd, mysqli and zip. Let’s get these enabled.

I ran:

sudo apt-get install php-cli php-gd php-mysqlnd php-curl php-json php-zip php-mbstring
For good measure, let’s restart apache.

> sudo service apache2 restart
Let’s confirm that the extensions are enabled

> sudo php –m
According to my output, all of the prerequisites now seem to be installed. If you are missing some of the other prerequisites, you might have to do some Googling to get the exact command you need.
Now we must adjust the PHP.ini file in order for Lychee to work properly. Use the following command:

> nano /etc/php/7.0/apache2/php.ini
You’ll want to find the following lines and change it to these settings:

max_execution_time = 200

post_max_size = 100M

upload_max_size = 100M

upload_max_filesize = 20M

memory_limit = 256M
Hint, you’ll be able to use CTRL+W to find these terms in Nano editor. You’ll simply find these values and change them and save the PHP.ini file.

Hit CTRL+O to save and select yes. You’ll want to hit CTRL+X to exit. It’s a good idea to reload Apache using the command we used previously to do so.

From here, we can clone the Lychee files onto the VPS. Use the following sequence of commands:

> cd /var/www/html

> git clone https://github.com/electerious/Lychee.git

> chown -R www-data:www-data /var/www/html/Lychee
Then change the permissions of the upload directory.

> cd Lychee

> sudo chmod -R 777 uploads/ data/
From here, let’s restart Apache one more time.

> sudo service apache2 restart
Congrats, you’ve installed Lychee. Let’s login to the app to continue configuring your new photo sharing application self-hosted on your VPS.

In your browser, go to http://<IPADDRESS>/Lychee

You’ll be asked for a server name, database username, database password and database name. If you’ve followed these instructions, you should simply enter in the database username and password that you created in a previous step and leave the rest of the fields blank.

Once this is complete, you’ll be able to create an administrative username and password for the Lychee app.

Now that the application setup is complete, you can begin uploading your photos onto your privately administrated virtual private server. For more information about Lychee, visit the project’s page on GitHub.


Photo-Management
lychee.electerious.com
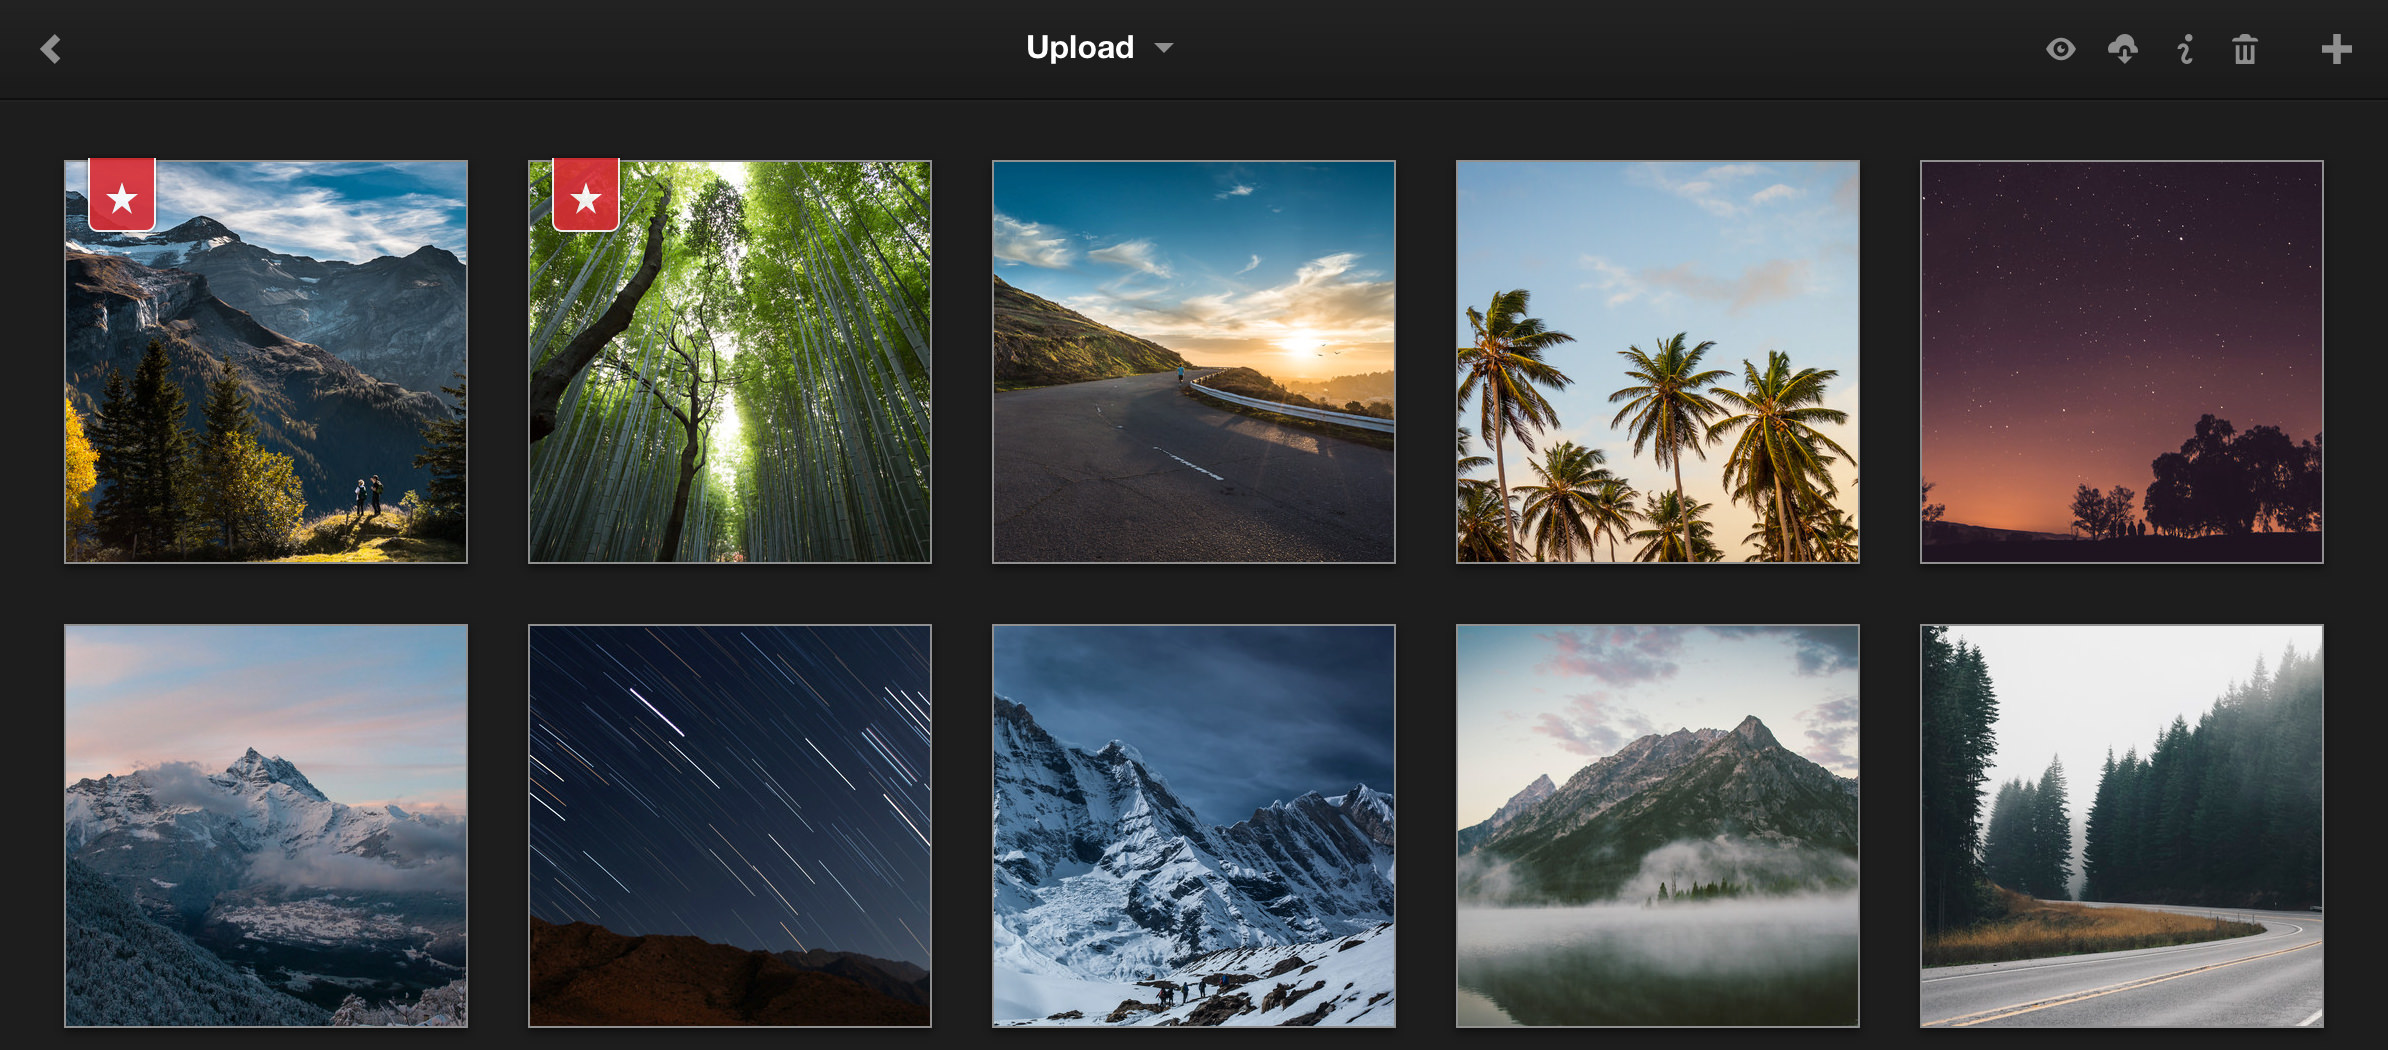
Screenshot of Lychee

Self-hosted photo-management done right

Lychee is a free photo-management tool, which runs on your server or web-space. Installing is a matter of seconds. Upload, manage and share photos like from a native application. Lychee comes with everything you need and all your photos are stored securely.

Manage

Managing your photos has never been easier. Upload, move, rename, describe, delete or search your photos in seconds. All in one place, right from your browser.

Share

Sharing like it should be. One click and every photo and album is ready for the public. You can also protect albums with passwords if you want. It's under your control.

View

Look at all your images in full-screen mode, navigate forward and backward by using your keyboard or let others enjoy your photos by making them public.

Open

Lychee is completely open-source. Everyone can take advantage of the work we have already done and improve it. We are open for every suggestion or help.

Secure

Your server, your data, your rules. Never depend on someone else. Lychee is a self-hosted solution, so you are in the full control of your photos.

Beautiful

Our goal was to create a web app everyone can use. Lychee works intuitive and comes with a stunning, beautiful interface.

Made for photographers

Lychee is the perfect place to store all your photos. No storage limit, no compression, no loss in data. We even support and display your EXIF and IPTC Metadata. And if you want, you can make your photos public for your audience. With just one click.

EXIF

Get the most out of our photos. Lychee supports EXIF and IPTC Metadata. Always available one click away. Clearly listed next to all other information.

Import

Import your photos from various sources. From you local computer, server, via URL or even from your Dropbox.

Tag

Never lose one of your photos in the depth of your albums. Tag them or mark them as important. Every single photo or all selected photos at once.

How To Install Ruby on Rails with rbenv on CentOS 7 or RHEL 7

1. Introduction

This article helps you install and configure Ruby on Rails on CentOS 7. By following some simple steps you can start riding on rails. Please feel free to let us know if you got struck anywhere, we will help you fix it.

2. Prerequisites

Here, We assume that you are having a CentOS 7 installed server with root access. Before continuing the installation we need to install LAMP/LEMP. You can follow the link to install LAMP and then proceed with the installation.

3. Installation

First of all, let me provide you a very short description about Ruby on Rails. Ruby is a programming language and while rails is just a Web application frame work which works on the principle (Model-View-Controller) MVC. Ruby on Rails is nothing but simply a web application framework written in Ruby. You can check there official link rubyonrails.org to know more.

3.1. Installation of Rbenv

Rbenv is a ruby version management tool. We will use this to install and manage our Ruby installation. So let’s start the installation of rbenv.
Installing the dependencies of Rbenv and Ruby. Use the following commands to install the dependencies.
# yum install -y git-core zlib zlib-devel gcc-c++ patch readline readline-devel libyaml-devel libffi-devel openssl-devel make bzip2 autoconf automake libtool bison curl sqlite-devel
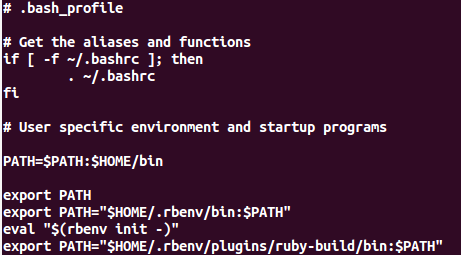
Now we are going to edit the bash profile file of the user who is going to use ruby. So make sure to take a backup of the .bash_profile at first . Then you may execute the following commands as the same user.
# cd
# git clone git://github.com/sstephenson/rbenv.git .rbenv
# echo 'export PATH="$HOME/.rbenv/bin:$PATH"' >> ~/.bash_profile
# echo 'eval "$(rbenv init -)"' >> ~/.bash_profile
# source ~/.bash_profile
# git clone git://github.com/sstephenson/ruby-build.git ~/.rbenv/plugins/ruby-build
# echo 'export PATH="$HOME/.rbenv/plugins/ruby-build/bin:$PATH"' >> ~/.bash_profile
# source ~/.bash_profile
Your bash profile look like the screen shot given below.
ruby-on-rails-bash
Thus you have installed rbenv. After completing this step, please open a new terminal to start using rbenv otherwise it will show “rbenv not found error”. Now we are ready to install Ruby.

3.2 Installation of Ruby

Before starting the installation, Check which version of ruby you want to install. Here, We are installing Ruby 2.2.1.
You may execute the commands below to install Ruby.
# rbenv install -v 2.2.1
The next step is to sets the default version of Ruby that all of your shells will use. If you want to install and use a different version, simply run the rbenv commands with a different version number.
# rbenv global 2.2.1
You can verify the installation using the command below. It will show you the version and details of the installation.
[root@hostname-centos7 ~]# ruby -v
ruby 2.2.1p85 (2015-02-26 revision 49769) [x86_64-linux]
Most of us do not want the documentation of each gems we install. If you would like to disable this, you may execute the command as below.
# echo "gem: --no-document" > ~/.gemrc
Now, Install the bundler gem which is used to manage your application dependencies using the following commands.
# gem install bundgem install bundlerler
Thus the Ruby is installed. Now we can move on to the installation of Rails.

3.3 Installation of Rails

As the same user who installed Ruby, execute the command below to install Rails. Here, We are installing Rails 4.2.0 version.
# gem install rails -v 4.2.0
We need to run rbenv rehash command whenever we use gem. to install/uninstall. The rbenv normally runs rbenv rehash automatically when you install/uninstall using gem. But to make sure, you may execute following command every time you use gem command.
# rbenv rehash
To check the version of Rails, you can execute the command below.
[root@hostname-centos7 ~]# rails -v
Rails 4.2.0
Thus, We have completed the installation of Ruby on Rails.

4. Apache Configuration (Configuring Ruby to run on Port 80)

Normally, The Ruby on Rails application run on port 3000. So, we need to specify the port all the time we access any of the ruby application. To avoid this, We made here a very simple proxy setup in apache configuration. The configuration is as follows.

ServerName testing.myruby.com
ProxyPreserveHost On
ProxyPass / http://yourip:3000/
ProxyPassReverse / http://yourip:3000/
 
In the above configuration, you need to specify your IP address instead “yourip” and save the file. After that, you may just restart the apache to reflect the changes.
# systemctl restart httpd
Thus the proxy setup via apache configuration is completed. Now we can test its working by creating an application.

5. Create a Test Application

To make sure that the Ruby on Rails installation completed successfully, We can create a test application by following the steps below.
Create an application in your home directory as follows:
# cd ~
# rails new testapp
Now, move on to the application directory:
# cd testapp
Then, create a sqlite3 database:
# rake db:create
Thus the configuration has been completed. Now, you can start your application by following the commands. Look at the screenshot below.
# rails server --binding=server_public_IP
ruby-on-rails-test
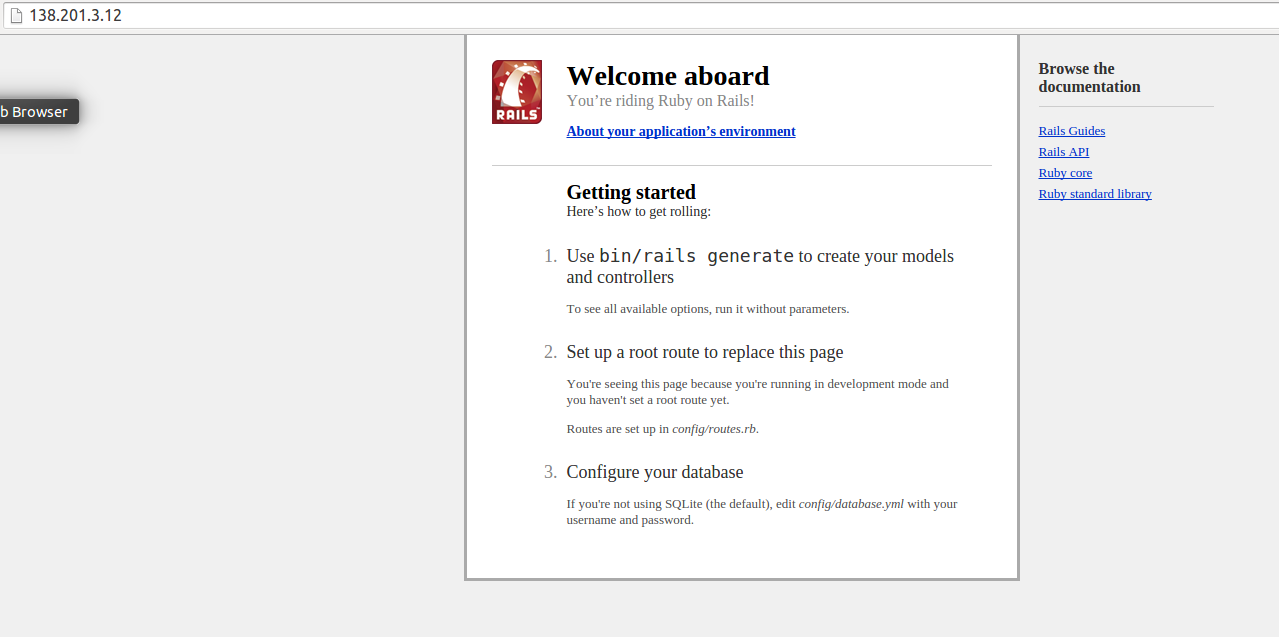
If it is running properly, You will get a welcome aboard page by visiting the URL below.
http://your_server_public_IP
You will see a welcome aboard page. It is the smoke test for a new Rails application. it makes sure that you have your software configured correctly enough to serve a page.
ruby-on-rails-proxy

6. Conclusion

Thus you are ready to start developing your new Ruby on Rails application. Enjoy !!

From syslint.com

How to install Ioncube Loader on CentOS 7 or RHEL 7 or Debian 8

1. Introduction

Ioncube loader is a PHP module or extension which makes PHP files or websites more secure. It also helps in speeding up webpages. It encrypts PHP language and used for many other PHP applications.

2. Requirements

Before installing ioncube loader your server must have php installed on both CentOs 7 and Debian 8.

3. Download and extract Ioncube Loader

I will be downloading the 64-bit version of ioncube loader as my system is a 64-bit server.
# cd /usrlocal/src
# wget http://downloads3.ioncube.com/loader_downloads/ioncube_loaders_lin_x86-64.tar.gz
# tar xfz ioncube_loaders_lin_x86-64.tar.gz

4. Configure ioncube loader

To configure ioncube we need to know which version of PHP is running.
Check the PHP version using the command:
# php -v
PHP 5.4.45 (cli) (built: Sep 30 2015 15:42:23) 
Copyright (c) 1997-2014 The PHP Group
Zend Engine v2.4.0, Copyright (c) 1998-2014 Zend Technologies
Now check PHP extension directory using the following command
# php -i | grep extension_dir
extension_dir => /usr/lib64/php/modules => /usr/lib64/php/modules
Note: not all versions of PHP use the same location. It may be different for other servers. Use exact location that you get.
Open the ioncube folder and copy the ioncube loader file that matches your PHP version.
# ls /usr/local/src/ioncube
# cp /usr/local/src/ioncube/ioncube_loader_lin_5.4.so /usr/lib64/php/modules
The next configuration step is a bit different for Centos and Debian/Ubuntu. We will have to add a line:
zend_extension = /usr/lib64/php/modules/ioncube_loader_lin_5.4.so
For CentOs 7:
Open the file /etc/php.ini and add the following line:
zend_extension = /usr/lib64/php/modules/ioncube_loader_lin_5.4.so
Now, restart the apache service.
# service httpd restart
For Debian 8:
In Debian there are separate php.ini files for PHP CLI, CGI, Apache2 and FPM mode such as:
/etc/php5/apache2/php.ini
/etc/php5/cli/php.ini
/etc/php5/cgi/php.ini
/etc/php5/fpm/php.ini
Add zend_extension to the files and save:
zend_extension = /usr/lib/php5/20131226/ioncube_loader_lin_5.6.so
Now, restart apache service.
# service apache2 restart

5. Check result

In centos7
# php -v
PHP 5.4.45 (cli) (built: Sep 30 2015 15:42:23) 
Copyright (c) 1997-2014 The PHP Group
Zend Engine v2.4.0, Copyright (c) 1998-2014 Zend Technologies
    with the ionCube PHP Loader (enabled) + Intrusion Protection from ioncube24.com (unconfigured) v5.0.19, Copyright (c) 2002-2015, by ionCube Ltd.
In Debian 8
# php -v
PHP 5.6.14-0+deb8u1 (cli) (built: Oct  4 2015 16:13:10) 
Copyright (c) 1997-2015 The PHP Group
Zend Engine v2.6.0, Copyright (c) 1998-2015 Zend Technologies
    with the ionCube PHP Loader (enabled) + Intrusion Protection from ioncube24.com (unconfigured) v5.0.19, Copyright (c) 2002-2015, by ionCube Ltd.
  with Zend OPcache v7.0.6-dev, Copyright (c) 1999-2015, by Zend Technologies
You can also check ioncube in the phpinfo() page in web browser.
Centos 7
ioncube-loader
Debian 8
ioncube-loader-debian